The turbo-ios repository includes an excellent demo app to get started with iOS development, powered by Turbo. After figuring out how the demo app works, you should have a pretty decent grasp of the basics. You'll be able to create a simple iOS app based on your Rails application.
In this article I will show you how to go from there and how to create an iOS app with a tab bar. Adding a tab bar to your iOS app greatly increases the number of options you have when designing an interface. It also makes your app feel more native than just wrapping your Rails app in a WKWebView.
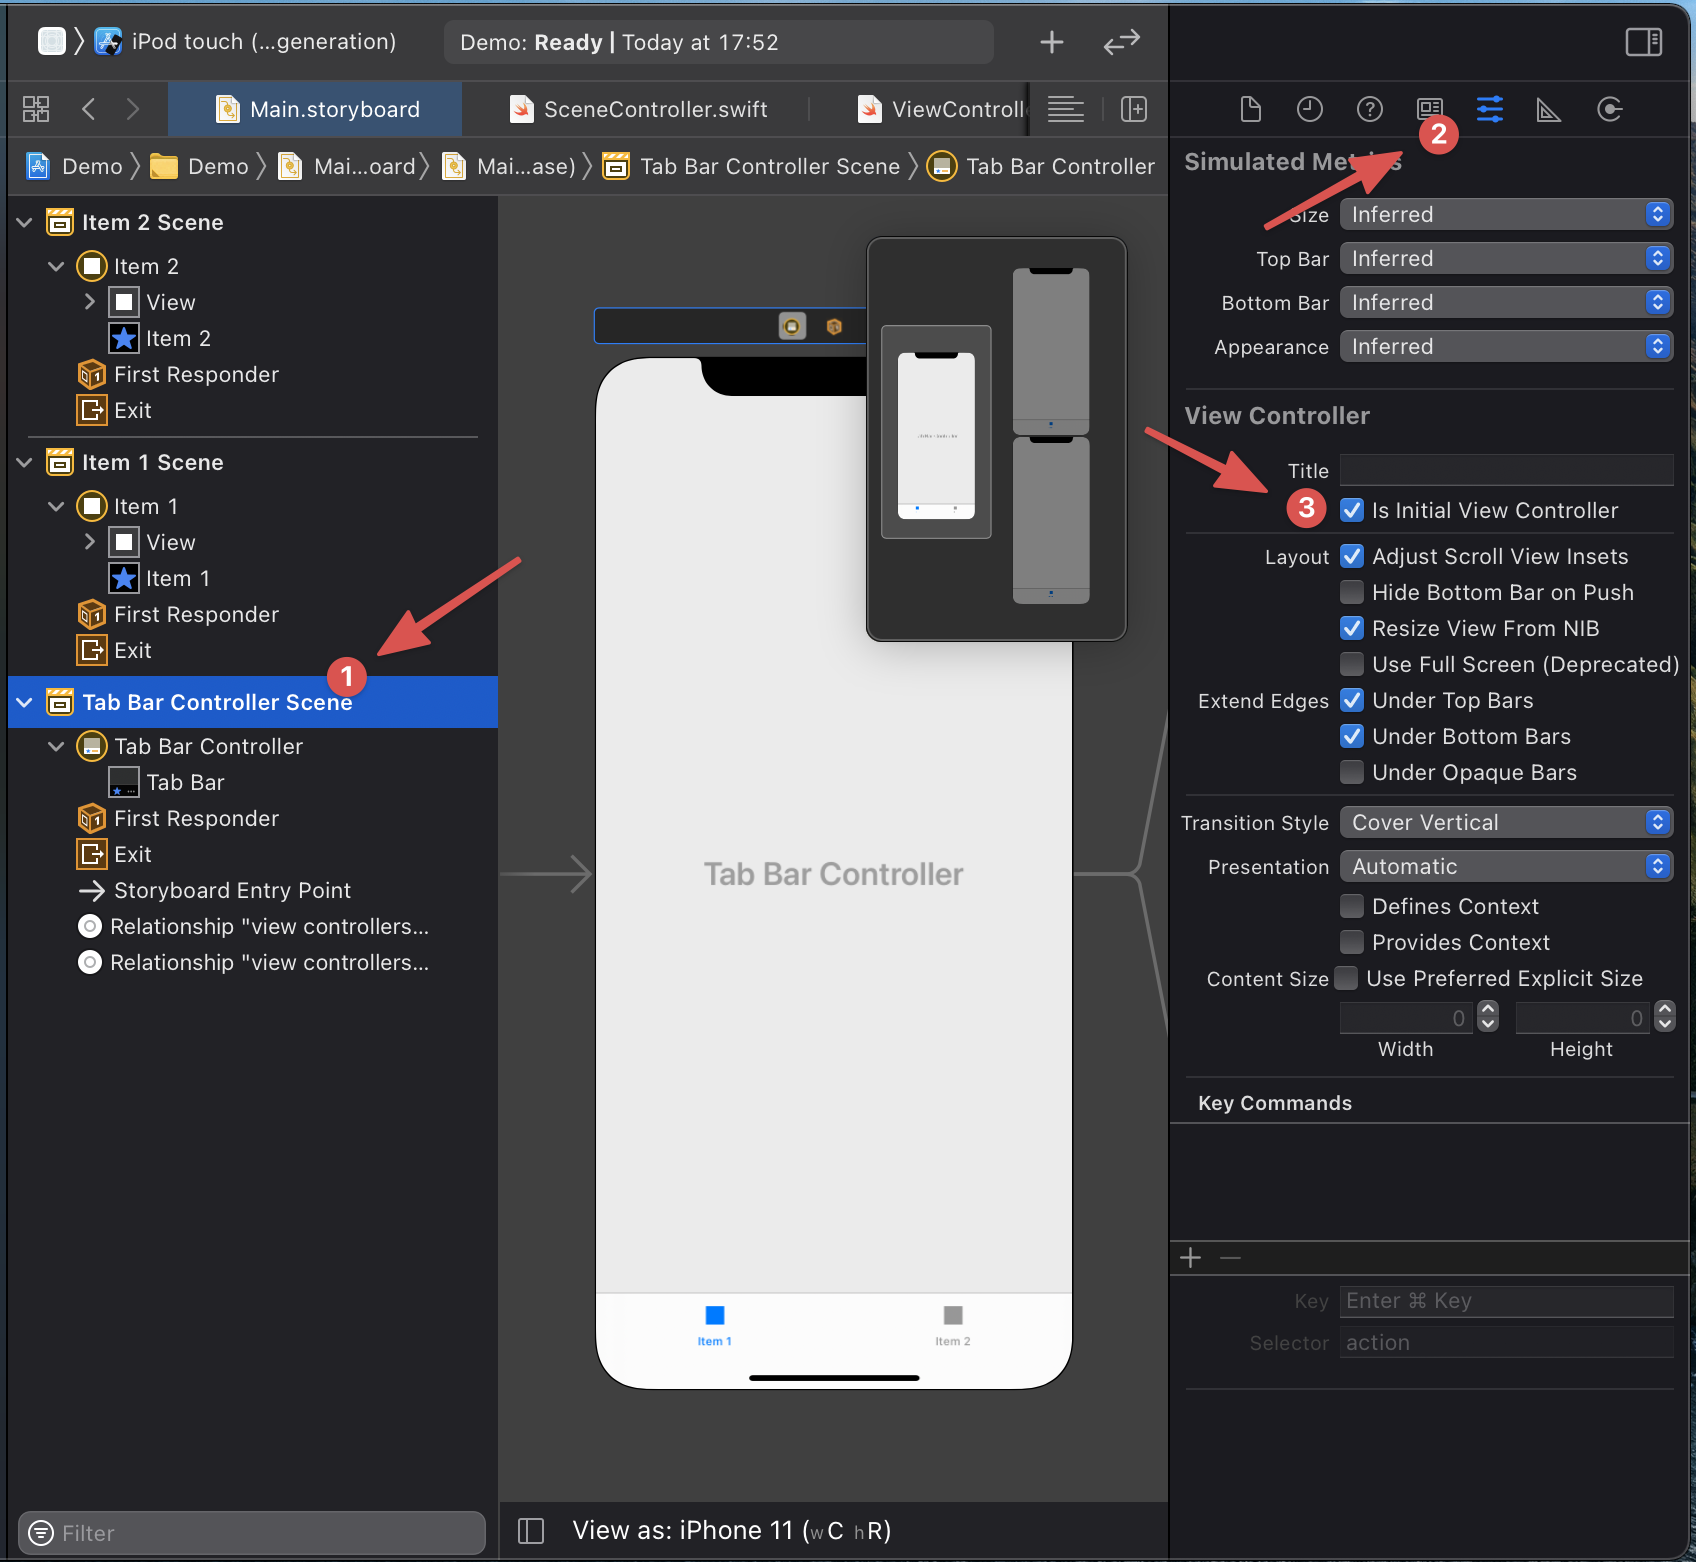
Step 1. Main.storyboard
Remove the existing Navigation Controller Scene and replace it with a Tab Bar Controller from the Library (Cmd+Shift+L). Select the Tab Bar Controller Scene and in the attributes inspector, select Is Initial View Controller.
Step 2. Create an ApplicationViewController
The demo app includes a SceneController to create and manage a Turbo session. For a tab based layout, I like to create multiple controllers that all inherit from an ApplicationViewController. Here's an example of that controller:
//
// ApplicationViewController.swift
// Turbo Demo
//
import UIKit
import Turbo
import SafariServices
import WebKit
class ApplicationViewController: UINavigationController {
privatelet rootURL = Demo.current
overridefunc viewDidLoad() {
super.viewDidLoad()
initialVisit()
}
func initialVisit() {
route(url: rootURL, options: VisitOptions(action: .replace), properties: [:])
}
func route(url: URL, options: VisitOptions, properties: PathProperties) {
// Dismiss any modals when receiving a new navigation
if presentedViewController != nil {
dismiss(animated: true)
}
// Special case of navigating home, issue a reload
if url.path == "/", !viewControllers.isEmpty {
popViewController(animated: false)
session.reload()
return
}
// - Create view controller appropriate for url/properties
// - Navigate to that with the correct presentation
// - Initiate the visit with Turbo
let viewController = makeViewController(for: url, properties: properties)
navigate(to: viewController, action: options.action, properties: properties)
visit(viewController: viewController, modal: isModal(properties))
}
privatefunc makeViewController(for url: URL, properties: PathProperties = [:]) -> UIViewController {
return ViewController(url: url)
}
privatefunc navigate(to viewController: UIViewController, action: VisitAction, properties: PathProperties = [:], animated: Bool = true) {
if isModal(properties) {
let modal = UINavigationController(rootViewController: viewController)
present(modal, animated: animated)
} elseif action == .replace {
let newViewControllers = Array(viewControllers.dropLast()) + [viewController]
setViewControllers(newViewControllers, animated: false)
} else {
pushViewController(viewController, animated: animated)
}
}
privatefunc visit(viewController: UIViewController, modal: Bool = false) {
guardlet visitable = viewController as? Visitable else { return }
if modal {
modalSession.visit(visitable)
} else {
session.visit(visitable)
}
}
// MARK: - Authenticationprivatefunc promptForAuthentication() {
let authURL = rootURL.appendingPathComponent("/login")
let properties = pathConfiguration.properties(for: authURL)
route(url: authURL, options: VisitOptions(), properties: properties)
}
// MARK: - Sessionsprivatelazyvar session = makeSession()
privatelazyvar modalSession = makeSession()
privatefunc makeSession() -> Session {
let configuration = WKWebViewConfiguration()
configuration.applicationNameForUserAgent = "Turbo Native iOS"
configuration.processPool = Demo.webViewProcessPool
let session = Session(webViewConfiguration: configuration)
session.delegate = self
session.pathConfiguration = pathConfiguration
return session
}
// MARK: - Path Configurationprivatelazyvar pathConfiguration = PathConfiguration(sources: [
.file(Bundle.main.url(forResource: "path-configuration", withExtension: "json")!)
])
privatefunc isModal(_ properties: PathProperties) -> Bool {
let presentation = properties["presentation"] as? String
return presentation == "modal"
}
}
extension ApplicationViewController: SessionDelegate {
func session(_ session: Session, didProposeVisit proposal: VisitProposal) {
route(url: proposal.url, options: proposal.options, properties: proposal.properties)
}
func session(_ session: Session, didFailRequestForVisitable visitable: Visitable, error: Error) {
iflet turboError = error as? TurboError, caselet .http(statusCode) = turboError, statusCode == 401 {
promptForAuthentication()
} elseiflet errorPresenter = visitable as? ErrorPresenter {
errorPresenter.presentError(error) { [weakself] inself?.session.reload()
}
} else {
let alert = UIAlertController(title: "Visit failed!", message: error.localizedDescription, preferredStyle: .alert)
alert.addAction(UIAlertAction(title: "OK", style: .default, handler: nil))
present(alert, animated: true)
}
}
func sessionDidLoadWebView(_ session: Session) {
session.webView.navigationDelegate = self
}
}
extension ApplicationViewController: WKNavigationDelegate {
func webView(_ webView: WKWebView, decidePolicyFor navigationAction: WKNavigationAction, decisionHandler: @escaping (WKNavigationActionPolicy) -> Void) {
if navigationAction.navigationType == .linkActivated {
// Any link that's not on the same domain as the Turbo root url will go through here
// Other links on the domain, but that have an extension that is non-html will also go here
// You can decide how to handle those, by default if you're not the navigationDelegate
// the Session will open them in the default browser
let url = navigationAction.request.url!
// For this demo, we'll load files from our domain in a SafariViewController so you
// don't need to leave the app. You might expand this in your app
// to open all audio/video/images in a native media viewer
if url.host == rootURL.host, !url.pathExtension.isEmpty {
let safariViewController = SFSafariViewController(url: url)
present(safariViewController, animated: true)
} else {
UIApplication.shared.open(url)
}
decisionHandler(.cancel)
} else {
decisionHandler(.allow)
}
}
}
Step 3. Create a new SceneDelegate.swift file
Since we won't be using the SceneController anymore, we need a new class to act as a UIWindowSceneDelegate. You can use the following SceneDelegate.swift example:
Make sure to set the correct value in your Info.plist file under Application Scene Manifest.
Step 4. Add webViewProcessPool to Demo struct
Because we're going to have multiple instances of the ApplicationViewController, we need to have a shared WKProcessPool so that all sessions are shared. We can accomplish that by adding it to the Demo.swift file. Don't forget to import WebKit.
import Foundation
import WebKit
struct Demo {
staticlet webViewProcessPool = WKProcessPool()
staticlet basic = URL(string: "https://turbo-native-demo.glitch.me")!
staticlet turbolinks5 = URL(string: "https://turbo-native-demo.glitch.me?turbolinks=1")!
staticlet local = URL(string: "http://localhost:45678")!
staticlet turbolinks5Local = URL(string: "http://localhost:45678?turbolinks=1")!
/// Update this to choose which demo is run
staticvar current: URL {
basic
}
}
Step 5. Set custom class for Item 1 Scene
Go back to your Main.storyboard and select Item 1 Scene. Show the Identity inspector and choose your newly created ApplicationViewController as the custom class. Make sure to select Inherit Module From Target (else XCode won't find your class). Try running your app. You should now have an app with two tab items where the first tab loads the root URL of the demo app.
Step 6. Add additional controllers
Having just one tab is obviously pointless, so we're going to add another one. The demo app example doesn't include a lot of content, so for this example we'll add another tab loading a different page.
I've created a new file called SomePageController.swift. This class inherits from ApplicationViewController and overrides the initialVisit method. Instead of visiting Demo.current, we append /one (this is a route in the demo server app).
In your Main.storyboard file, change the custom class of Item 2 Scene to your new controller, just like we did with Item 1.
Step 7. Run your app!
Run your app and be amazed! Notice how each tab maintains it's state and navigation. Also notice that the tab item's title is fetched from the <title>-tag of your initial visit. The label will not change on subsequent visits.
Of course, this is just the beginning. Use Interface Builder to change your ViewControllers' icons, or add more items to the Tab Bar Controller.